Welcome to SISTER'S CUISINE a Best Quality Recipe's Platform
Degchi Se Chip-Chipay Haton Tak: The Definitive Guide to Mutton Paya
By Nabila Imran | The Flavor Architect at Sister’s Cuisines
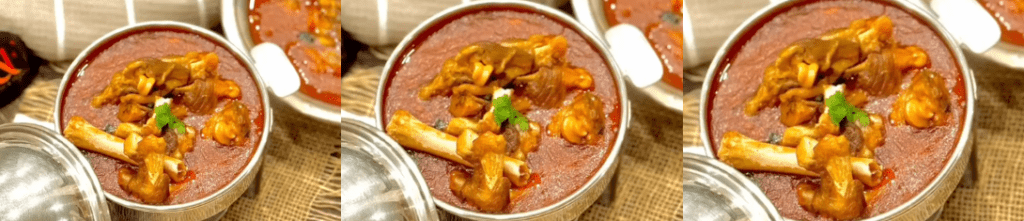
There is a specific kind of magic that happens in a kitchen during the winter months. It’s the sound of a heavy-bottomed degchi simmering on a low flame and the aroma of whole spices infusing into a rich broth. But the real test of a perfect Mutton Paya? It’s the “chip-chipa” (sticky) feeling on your fingers as you break a piece of hot Khameeri roti and dip it into the gravy.
If you know, you know.
At Sister’s Cuisines, I’m taking you on a journey—a journey from the raw ingredients to that perfectly gelatinous, soulful finish. Forget those thin, watery gravies you find in commercial eateries. Today, we are making the real deal.
📜 The Story Behind the Dish: A Legacy of Patience
Mutton Paya is not just a meal; it is a tradition that demands patience. In our heritage, Paya was often started late at night, allowed to simmer through the cold hours so that by Sehri or breakfast, the bones had surrendered all their essence to the soup.
As your Flavor Architect, I believe the secret lies in two pillars: The Bhunai (searing) and The Slow Simmer. By searing the trotters in aromatic spices and Desi Ghee, we remove any unwanted odors and lock in the juices. As it simmers for hours, the natural collagen is released, creating a gravy that is naturally thick, incredibly nourishing, and deeply restorative.
🛒 The Blueprint: Ingredients
For Boiling the Paya (The Foundation)
- Mutton Paya (Trotters): 8 pieces (Cleaned thoroughly)
- Desi Ghee: 1 tbsp (For that authentic royal aroma)
- Whole Spices: 2 Bay leaves, 7-8 Peppercorns, 2 Black Cardamom, 1-2 Star Anise
- Aromatics: 1 tbsp Ginger Garlic Paste
- Color: 1/3 tsp Turmeric Powder
- Liquid Gold: 1.5 Liters of Water
For the Masala (The Soul)
- Desi Ghee: 2 tbsp
- Base: 1 tbsp Ginger Garlic Paste
- Spice Blend: 1 tbsp Red Chili Powder, ½ tsp Turmeric, Salt to taste
- The Crunch: 1 tbsp Crushed Cumin Seeds & 1 tsp Crushed Black Pepper
- Heat: 1 tbsp Green Chili Paste
- The Body: 3 tbsp Thick Yogurt & 1/2 cup Crushed Fried Onions
👩🍳 The Architect’s Method: Step-by-Step
Step 1: The Searing & Boiling
We begin by heating the Desi Ghee and tossing in our whole spices. Once they crackle and release their oils, add the cleaned paya. This initial fry is crucial—it removes the “heck” (raw smell) and starts the flavor building. Add the ginger-garlic paste, turmeric, and water. Now, we wait. Let it simmer on a low flame for about an hour until the meat is tender and the stock is rich.
Step 2: Crafting the Masala
In a separate pan, we build our flavor profile. Sauté the ginger-garlic paste in ghee, then add your dry spices. Add a splash of water to prevent burning during the bhunai. Fold in the green chili paste, yogurt, and those beautiful golden fried onions. Cook until the oil (tarka) separates and the masala looks grainy and rich.
Step 3: The Slow Simmer
Combine the masala with the boiled paya. This is where the “Slow Cooked Magic” happens. Let it cook together for another 1 to 1.5 hours. This allows the spices to penetrate the marrow and the gravy to reduce into that signature sticky, lip-smacking consistency.
🥖 Serving Suggestions: The Perfect Pairing
A dish this rich deserves the right companion. Serve your Mutton Paya piping hot with:
- Khameeri Roti or Fresh Naan to soak up every drop of the sticky gravy.
- Garnish: Freshly sliced ginger, chopped coriander, and a squeeze of lemon to cut through the richness.
🔪 The Chef’s Mission: Nabila Imran
I am Nabila Imran, your Flavor Architect. At Sister’s Cuisines, my mission is to safeguard our culinary legacy. We blend authentic Urdu recipes with professional techniques to ensure you don’t just cook—you create heritage. Whether it’s a staple Pakistani recipe or a complex Indian delicacy, I am here to help you bring the warmth of our ancestors back to the modern family table.
💖 Your Authentic Culinary Hub From viral street food to the slow-cooked wonders of the past, join our family as we celebrate the art of South Asian gastronomy.
What is your favorite winter comfort food? Do you prefer your Paya spicy or mild? Let’s chat in the comments below! 👇✨
#️⃣ Stay Connected
MORE BLOGS :
Chane Ki Dal Halwa: The Ultimate Festive Mithai (A Royal, Slow-Cooked Delicacy)
Bhindi Gosht: The Secret to Non-Slimy Perfection (A Comfort Curry Masterclass)
Spicy Crab Masala: A Feast of Flavor with Secret Special Spices
Green Garlic Pickle (Lehsun ka Achar): Your Quick & Tangy Winter Relish!
Hari Mirch Chicken Qeema: The Ultimate Green Chili Mince (A Weeknight Delight)
Deghi Style Mutton Qorma (Velvety, Aromatic, and Rich)
Easy and Delicious Chicken Salami Recipe
Desi Indian Moong Dal Recipe – Comforting, Healthy, and Authentically Desi
Hyderabadi Nizami Chicken – Royal Desi Recipe with a Touch of Humor